


Having trouble viewing this video? Please visit our Video FAQ page
David’s scratchbuilt sawmill needed a roof. So in this episode of his Olympia Logging Co. On30 layout expansion blog, he’ll share how to model a tin roof using corrugated styrene sheet. Watch and learn how to measure, cut, install, paint, and weather the material to suit the rustic structure.


I have a Walthers Glacier Gravel kit and it has plastic corrugated siding. I am going to use your technique to weather the siding. thx
I really liked the rust effect on the corrugated tin roof, I’m going to use that technique
I really like the finished saw mill, it looks fantastic. I especially like the flickering firebox, it just sets the model off perfectly. I have enjoyed the whole Olympia project and hope there are a few more episodes yet.
I really like the Olympia blog. The best you have made, if you ask me.
You say you are coming to a final close…. 🙁
But I hope the last blog will be a tour around the hole layout. A film where we can see all the fine details you have made….
Great work… 🙂
Fantastic model – you make it look so easy ! Great job !!
Very nice model David. Particularly the tin roof and the boiler. I remember seeing a line shaft powered stave mill in the 50’s and your model does it justice. I also visited a sawmill in Arkansas that was in a building remarkably like yours. They had a natural gas boiler for the steam carriage drive and electric motors for the remaining equipment. So I’d give an “A” for authenticity in your modeling. your steam engine for powering the carriage drive and line shafts will need an exhaust pipe through the roof above to vent the exhaust. Nobody would want to be around the exhaust steam. It’s hot and reeks of the cylinder oil the engine uses for cylinder lubrication.
Dullcote?
Yup, sorry Richard, if I didn’t clearly state that in the video.
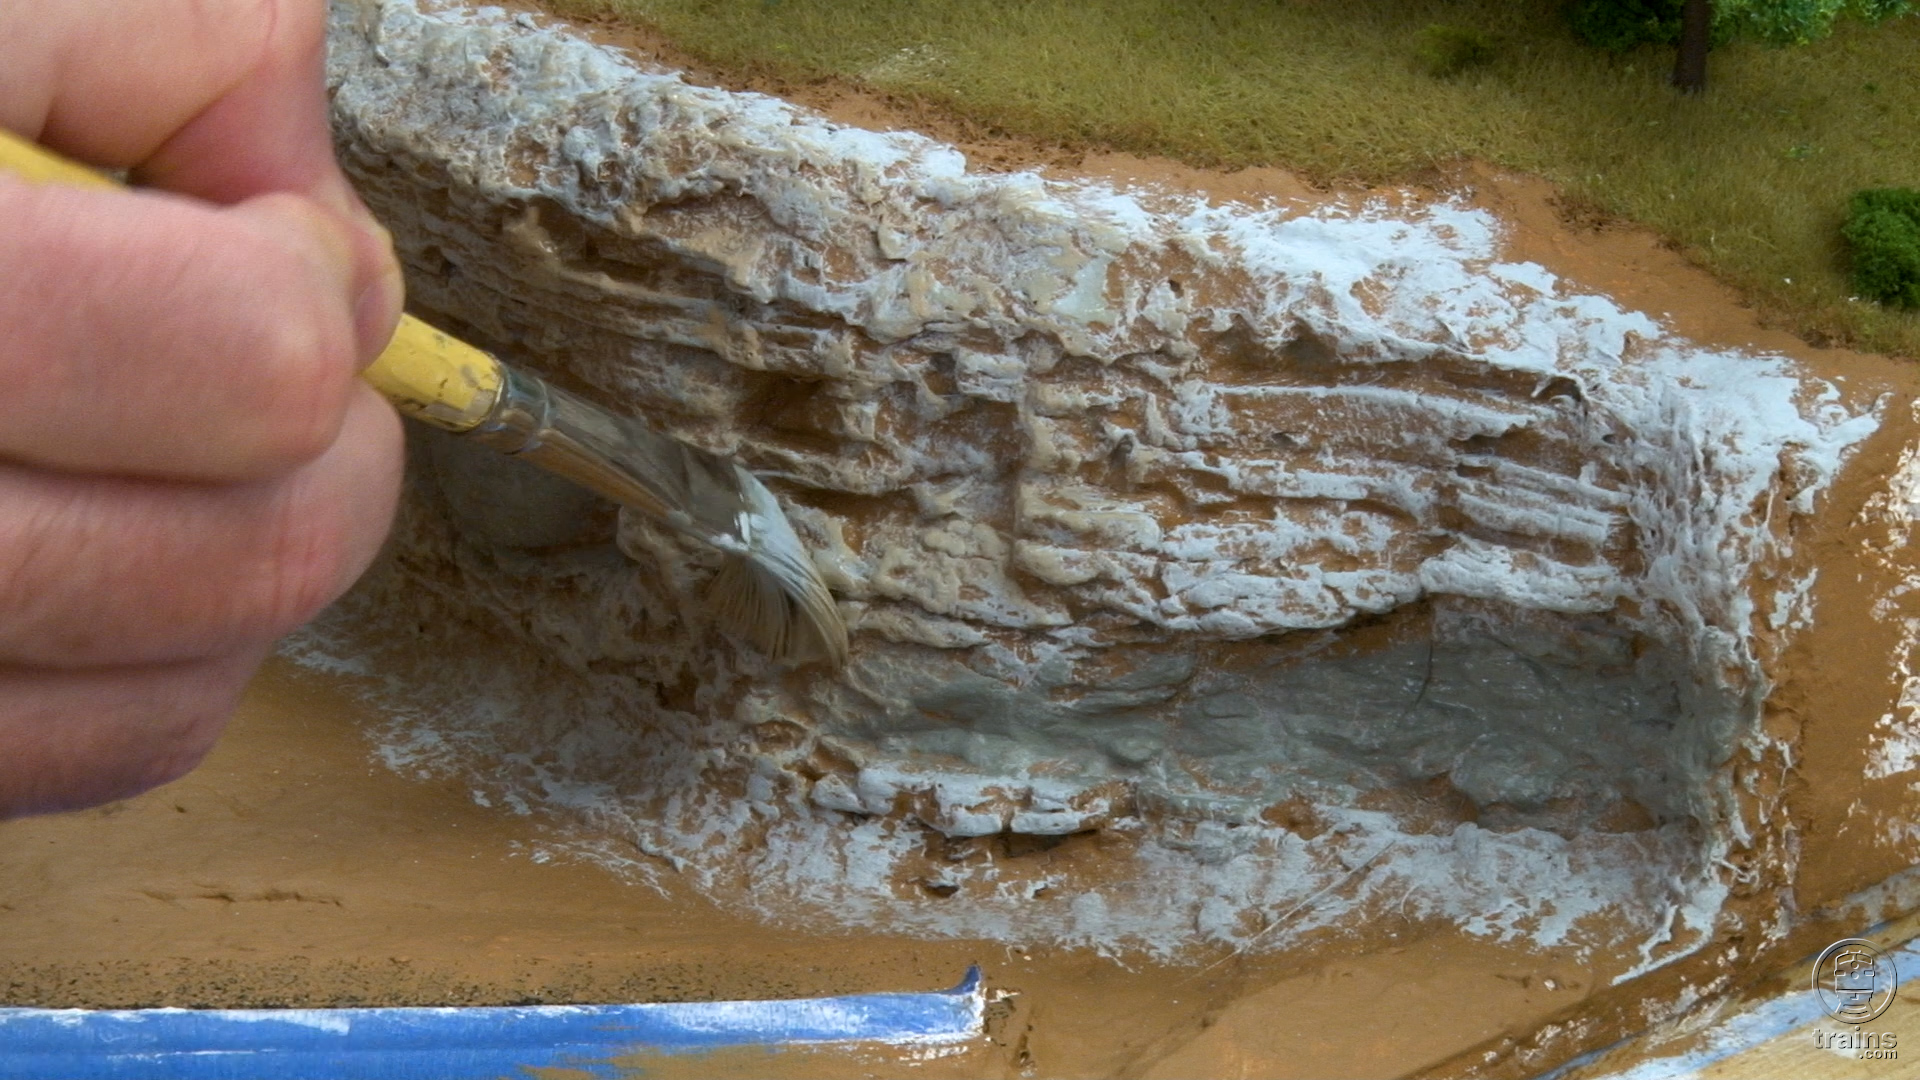
After priming the roof gray, it got a coat of Dullcote. It’s essentially the same technique I used in the “My game’s a bit rusty” episode on the steam engine for the A frame.
You can also get that bleached effect without using the rust pigments by simply spraying Dullcote on a surface, then brushing on or misting on rubbing alcohol. It’s a great weathering technique and it’s easy to use. The best part is if you don’t like the effect, apply a new coat of Dullcote and it fading goes away instantly.
More to come on Olympia next month!
D.
Thanks for sharing this technique. It was perfectly timed as I was building the Banta Modelworks kit for the Alta Mine tramhouse at Ophir on the Rio Grande Southern…a large structure completely skinned in Campbell corrugated metal sheets. This technique worked perfectly for me and now I’m considering retroactively applying it to other structures I’ve already completed.
David, when you started weathering the roof you mentioned that some of the whiter spots occurred when the liquid interacted with the dullcote. I went back and rewatched the few minutes prior to that to see if you mentioned applying dullcote but didn’t hear anything about that. Did you overspray the paint with dullcote before applying weathering? Great looking roof!
Another excellent presentation David. Helpful tips to take a model from good, to excellent, to a realistic building. This needs to be displayed at Trainfest this year.
Great outcome to a neat project.
Smoke would be a good final cap off.
Have always wondered why all the smoke for O and now HO scale trains is always white smoke. Most locomotives and other boilers puffed black smoke.
Looks very nice, indeed!
WOW!!!
The Log Blog just gets better & better! Thanks for going into more detail on the roof construction & weathering techniques. We can all benefit from your excellent modelling skills no matter in what scale we model! Great job, David!
David, you did good!!
Favorite project railroad yet! I look forward to each new episode!! Dave, sad to hear you say only few more episodes left!! Noooo!!!!! 🙂 We need an Olympia 3!!!
I was disappointed to see your former N scale layout disappear. This, however, has been a fun project to watch.
Great modeling job David. Just got back from Cass, WV today and the roof or what’s left of it on that old sawmill at the state park looks just like the one you’ve just modeled. Glad to see that the guy shoveling fuel into the boiler has a source material, sawdust, good response, thanks.
The tin roof looks great, especially after being weathered. One thing I was thinking is would the horizontal rows of tin be staggered so the Virgil’s joints don’t line up?
David, I have enjoyed this series, thank you. You need a smoke unit to go along with your fire!!
Nice video Dave.
Don’t forget that any logs hauled out of the pond would leave water on the log shute as well.
Mr. Steve Curry: Look up Mini micro JST connectors. They come in various combinations from 2- to 7-pin configurations.
Looks great David,
I love the weathering on the tin roof, the mill came out looking a lot better then the kit you took the interior bits from. Scratch building always looks good, it just has a special look all it’s own. I’m looking forward to the next log blog.
Excellent video. I have a corrugated metal Quonset hut and I will be using these techniques to add the realism.
Excellent video, and series! I love the roof! I noticed the micro connector for the wiring, I am installing LED’s in my structures. Some structures will have many LED’s that I want to control separately. Is there a micro connector for a larger number of wires, for instance 20?