Sketching with Steve
Introduction to track templates
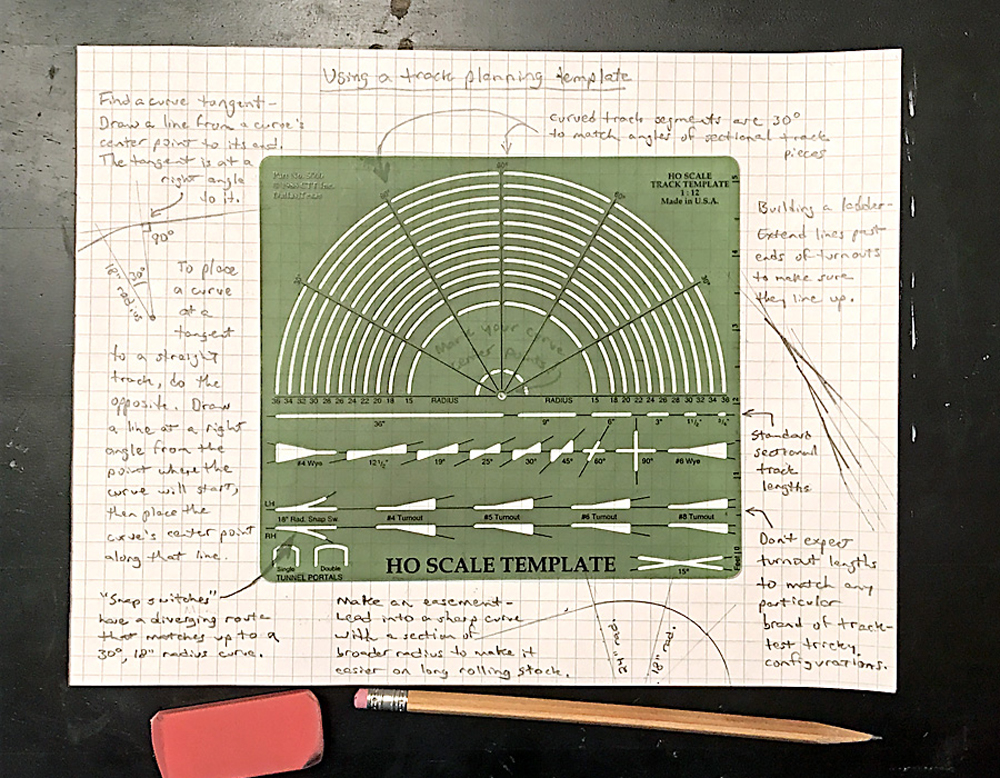
Learning to use a track template was among the first tasks I gave myself as a model railroader.
You may have seen one of them hanging next to the register in your local hobby shop. Perhaps, in these days of point-and-click track-planning software, you thought it was a throwback, a waste of time. And while it’s true that software is a lot more precise, it can have a frustratingly steep learning curve. There’s nothing better than paper and pencil for blue-skying new ideas to see what might be doable in your space.
A track-planning template, like the green HO scale one in the photo above, helps you transform your sketchy ideas into a buildable model railroad track plan. The dimensions of the traceable track components, like turnouts and crossings, are generic, not corresponding to the geometry of any particular manufacturer’s components. But the shapes are accurate, helping you decide if your switchback will work or whether your yard ladder will fit three or four turnouts. And although the curves on the template are designed to correspond to the shape of sectional track components (each curve segment is 30 degrees), even if you plan to use flextrack, following the template’s curves can keep you honest in ways freehand sketching never could.
For example, to join two straightaways, extend both track centerlines until they intersect, then position the template so the curve you want to use just touches both lines without crossing either (geometry calls this a tangent). Then simply draw the curve in between the two tangent points. You can do the same thing with a compass, but with a template it’s a lot easier.
To make a smooth, kink-free transition from a curve to a straight, mark the center point of the curve, then use a straightedge to draw a radius from there to the tangent point where the straight track will begin. Then use a drawing square to draw the tangent track at a right angle to the radius. Or, if the corner of your template isn’t rounded off like mine, just use the edge of the template.
To place a smooth curve off the end of a straight track, do the opposite. Draw a guideline at right angles to the straightaway, starting from the intended tangent point, then place your curve’s center point along that guideline.
If you run long rolling stock, like intermodal flatcars or modern passenger equipment, you might want to make the entry to your curves more gradual with an easement. Simply incorporate a broader radius section to begin your curve. To keep the transition kink-free, make sure the center point of both curves lies along the same straight line, at right angles to the tangent where the curves meet.
Track template limitations
Learning to use a track template also means learning its limitations. When designing intricate trackwork like crossovers or yard ladders, you might find that the template’s generic turnouts and crossings aren’t precise enough to know for sure whether things will work as planned. That’s when you make photocopies of your track components and tape them together to test the fit, or bite the bullet and buy that track-planning software. But track-planning software has only been around for a little more than 30 years, and some of the greatest model railroads in history were designed by people like John Armstrong using only paper, pencil, and their trusty track template.
Looking to learn more about how to create your own model railroad trackplan? Check out Track Planning for Beginners, a FREE 15-page PDF which will teach you the ins and outs of designing your own model railroad layout!
Share this article