As soon as my railway was operational I began to teach myself how to build scale structures, including how to build a small cottage. While searching the internet, I came across images of English/French tudor cottages. I like the high-pitched roofs and the exposed half-timbers of this style, and I settled for one that had a light blue shingled roof. This image was just one page, but it showed all four elevations of the cottage, so it gave me a good idea of what the finished structure should look like.
Because information in GR articles have taught me that outdoor structures need to be sturdy to withstand the elements, I used ¼” cement board for the walls, plexiglass for the roof underlayment, and pressure-treated wood and cedar strips for half-timbers, trimmings, and shingles.
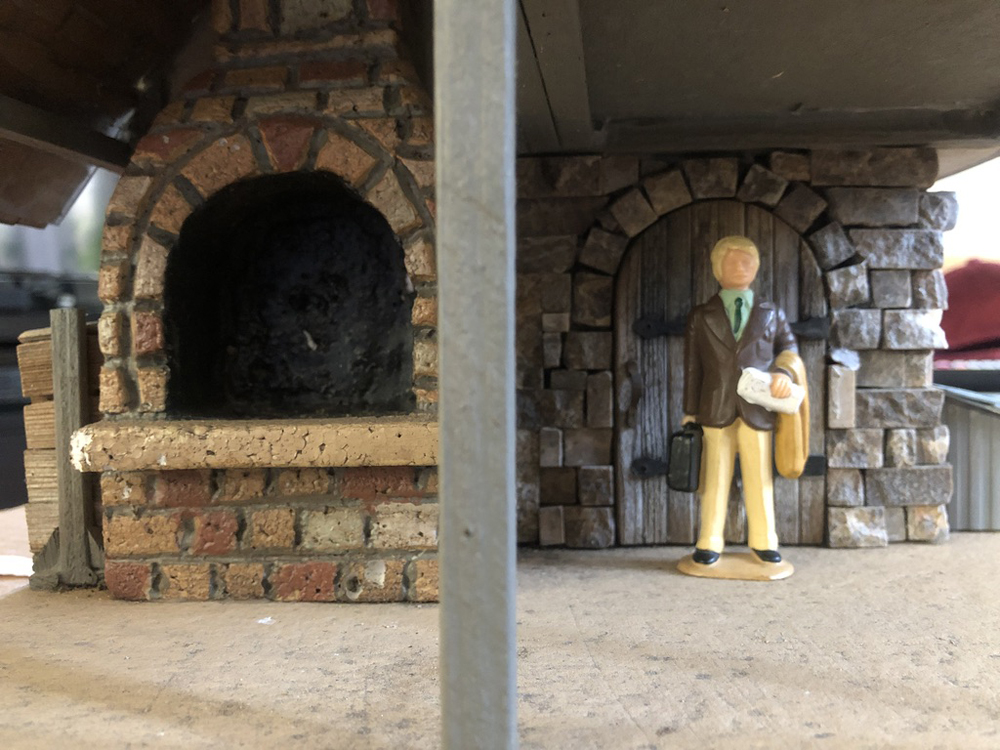
I’m a bit challenged when it comes to converting 1:1 measurements to large scale, so to make my life easy, I used a 3” standing passenger figure as a starting point to determine the measures and sizes that I would use. If that figure could represent a 6-foot person, then the height of each floor should be 4” to represent 8-foot walls. The rest of the measurements would follow this reference.
Materials
- ¼” cement board for base, walls, and floors
- 1/8” x ¼” cedar strips for front door, half-timbers, window trimmings, and shutters
- ¾” x ½” cedar shingles for roof
- ¼” thick cedar stock for two large brackets
- ¼” x ¼” pressure treated wood for reinforcement at corners, and for “structural” beams
- 2¾” x 3½” x 14½” piece of rigid foam for chimney
- 12” x 12” tile of tiny rectangular stones, for exterior of first floor walls
- Clear silicone adhesive caulk
- Waterproof carpenter’s glue
- Weather Proofing All-in-one Wood Stain and Sealer (Behr): Gettysburg (light blue) for roof, Sandal (tan) for base and chimney, and Pewter (dark gray) for all wood walls and trimmings
- Latex exterior paint, light yellow, for stucco walls (small sample jars are perfect)
- 23-gauge pins to attach trimming and beams (using pneumatic nailer)
- 1” wide aluminum strip for roof ridges
- 1/8” wide copper strip for dummy door hinges
- Thin aluminum strips (from soda can) for roof/chimney flashing
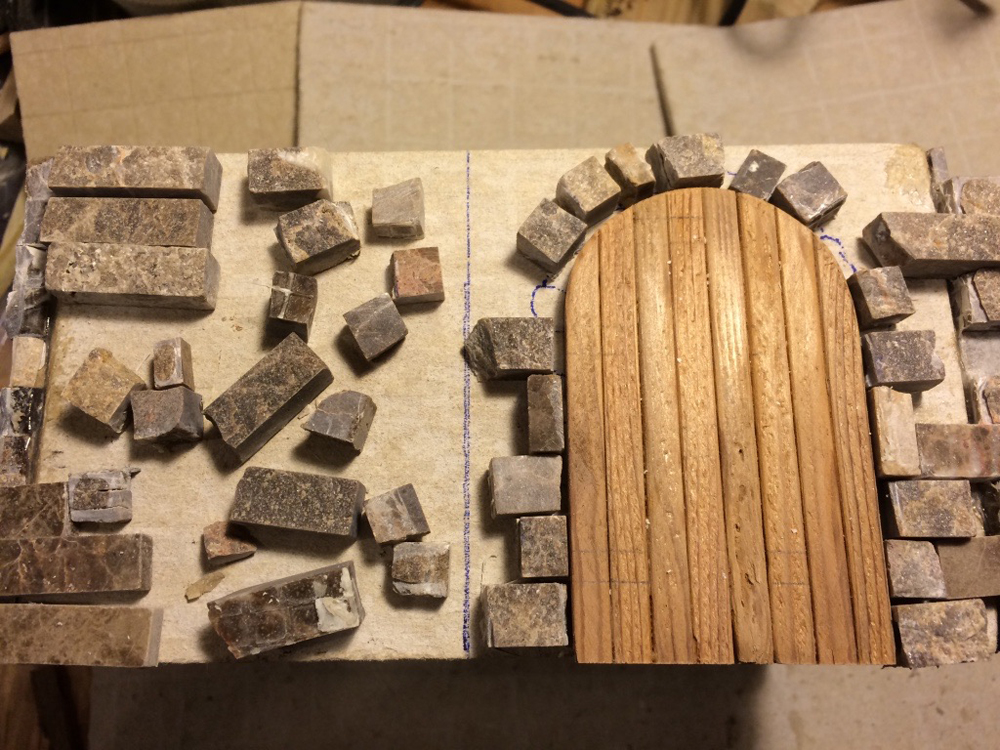
The cottage image shows a stone first floor, so I used tiny rectangular stones (12” x 12” tile I purchased at a flooring place) to veneer the cement board walls. The second floor is also made out of cement board to represent stucco with the half-timbers showing.
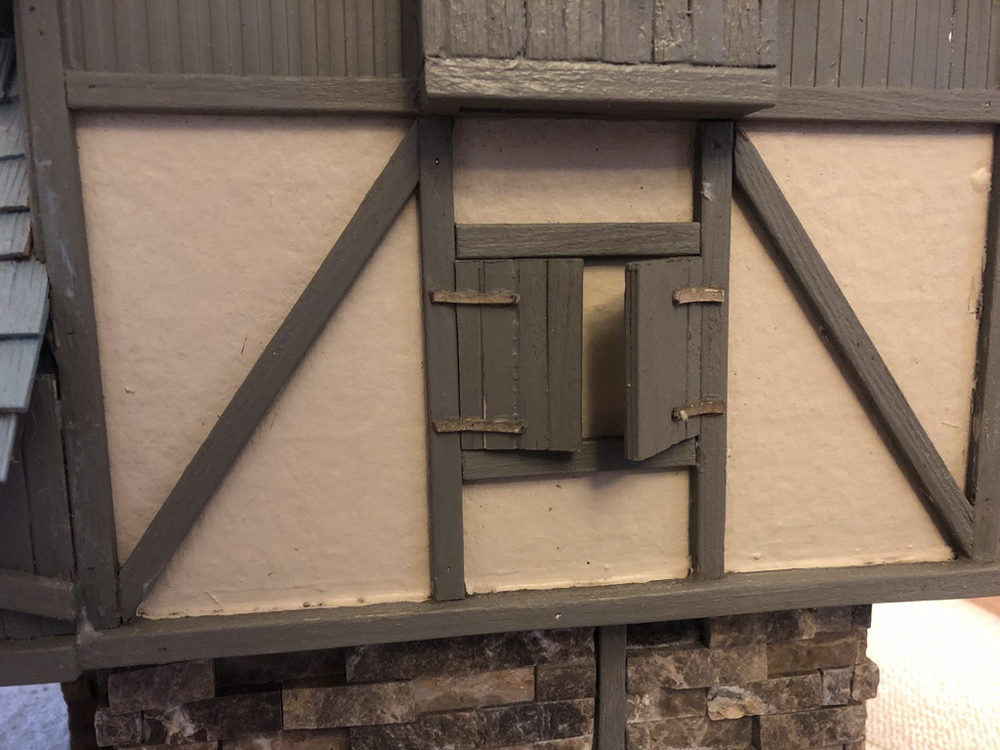
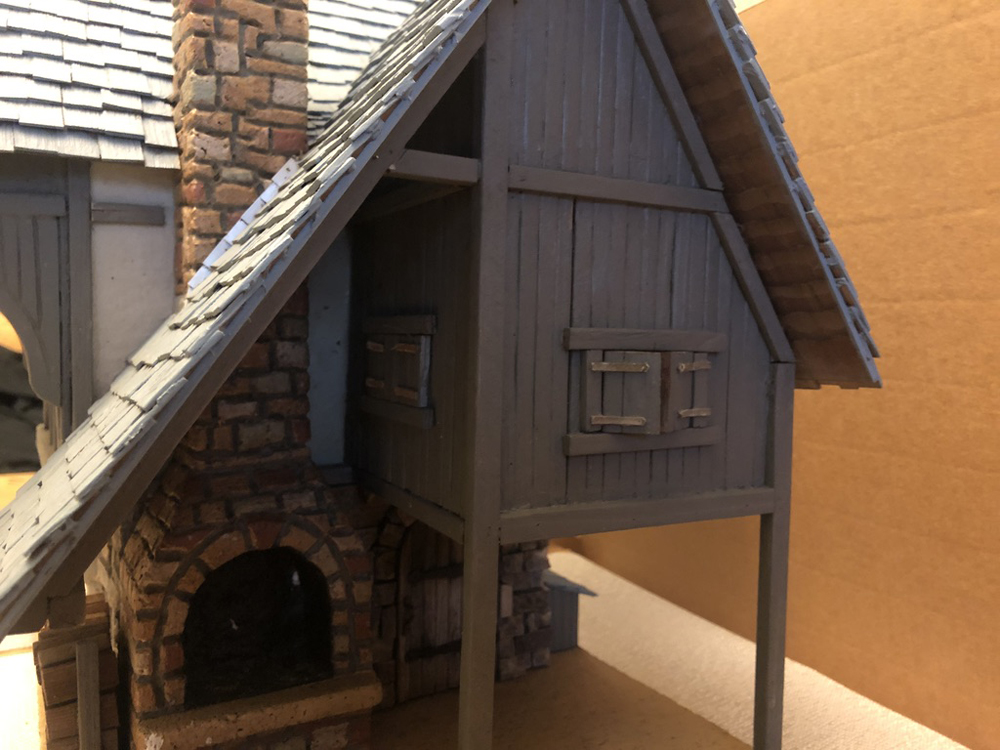
According to the image, the second floor has an addition over the door made from wood.
I did not make any openings in the cement board for windows or the door. Though the door does not open, the shutters do, to reveal the wall behind. The windows in the wooden walls have openings with working shutters.
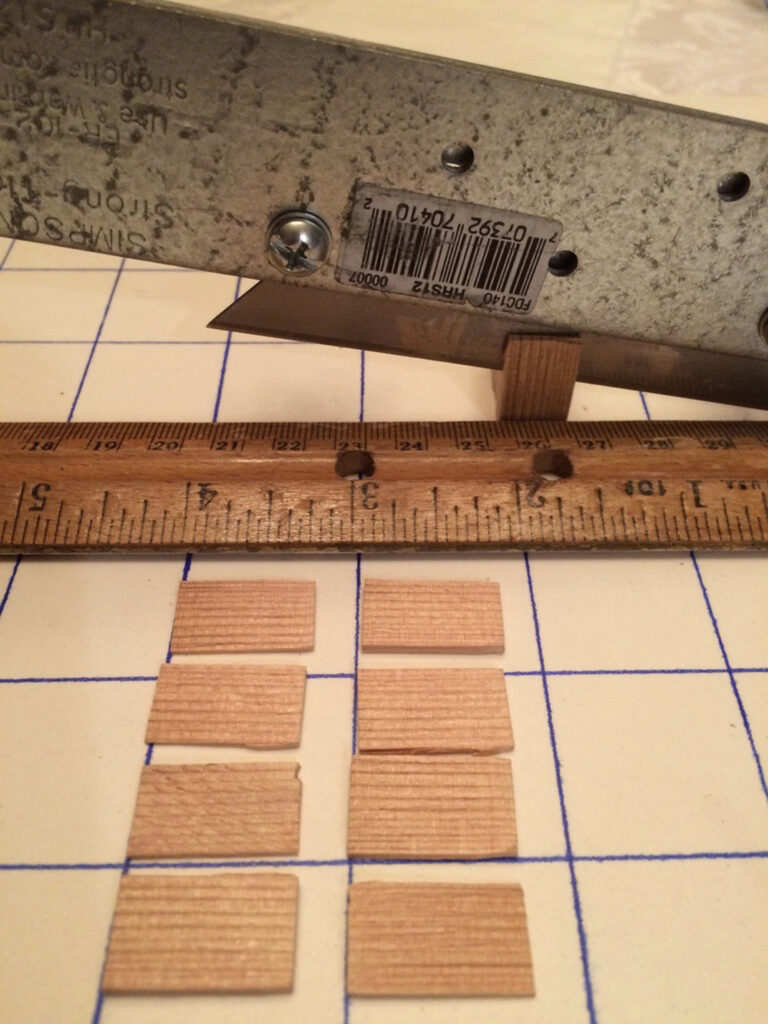
Since the shingles were a key element in this structure, I built a cutting tool (which was featured in the August 2015 issue of GR, to split about 1,300 cedar shingles.

I wanted the chimney to be a real eye catcher, but I did not want to deal with individual bricks or stones, so I made it out of a piece of rigid foam and carved in stones and other details.
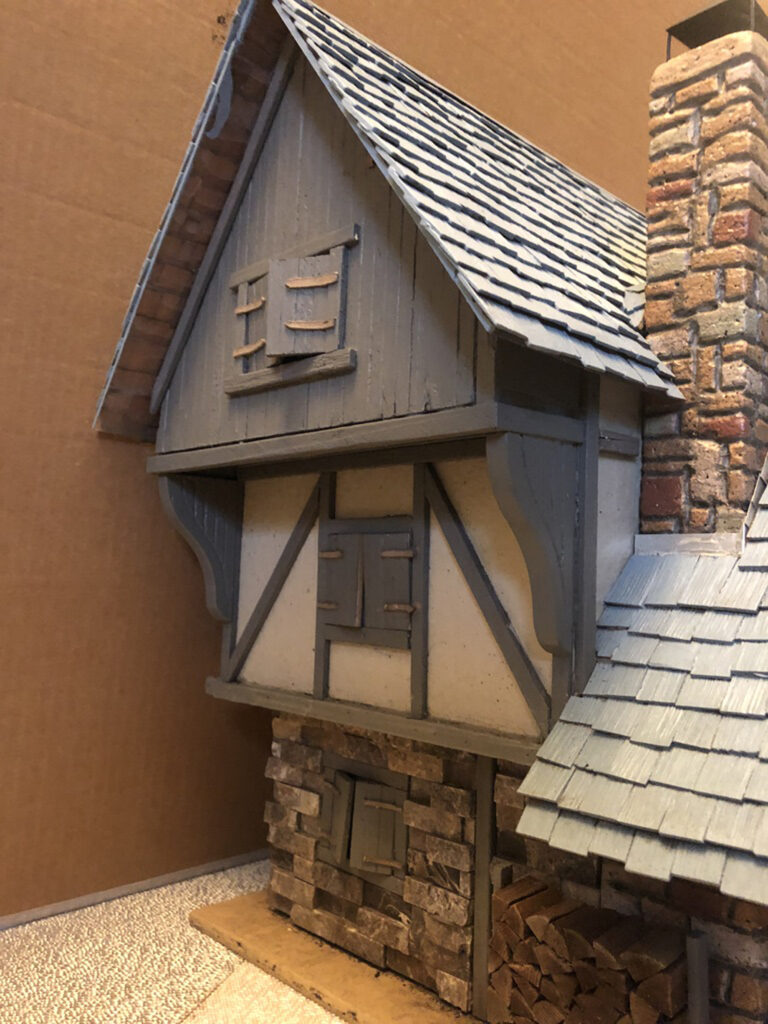
While studying Tudor-style structures I noticed that typically upper floors overhung the floor below. The second floor is larger than the first floor, and the attic is larger than the second floor. Since the attic overhang is made of wood, I built it in place after the second-floor cement walls were assembled.
It helped tremendously to make cardboard templates for all the walls, floors, bases, and roof panels. This allowed me to test how these parts would look and fit so I could make any necessary adjustments.
Most of the ¼” pressure-treated strips are used to represent structural framing beams. The structural strength of this building comes from the cement board bases and walls glued together, and the plexiglass roofs glued to the walls.
I purchased inexpensive sample jars of exterior latex house paint and small cans of wood stains.
Since I did not have actual plans, I had to deal with a good amount of trial and error, customization, and managing “field conditions” that surfaced as I built the cottage. Be ready to make minor adjustments, as needed, to the dimensions I’m providing below.
Cottage elevations
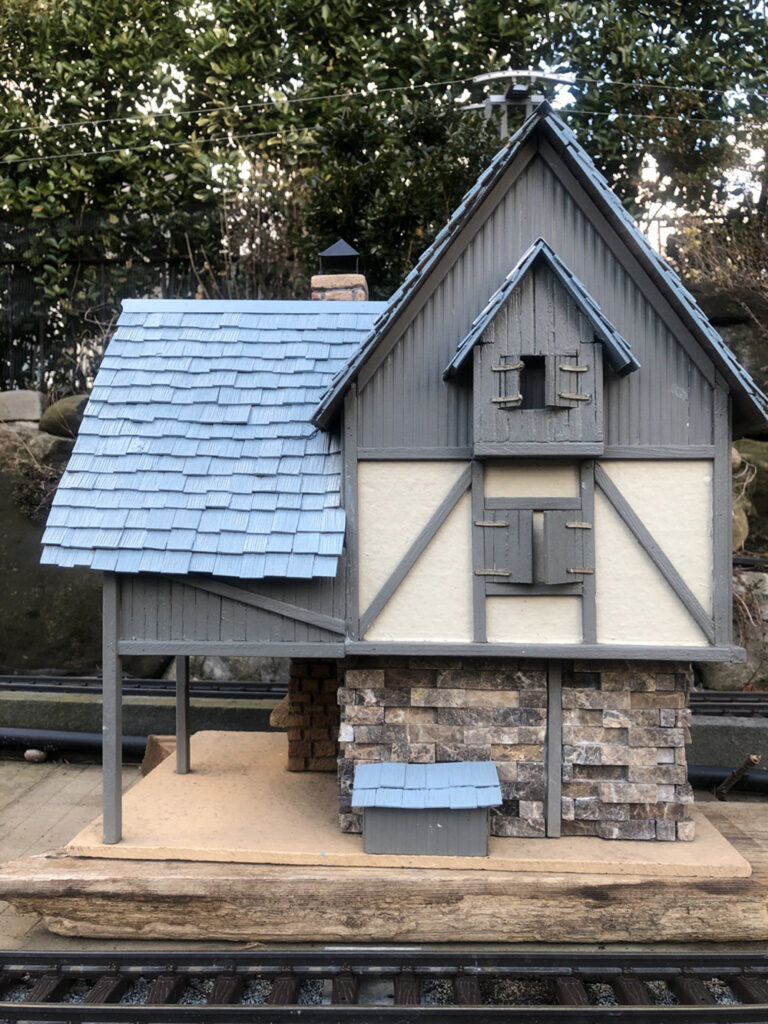
East wall – has the protruding attic box window with its own pitched roof
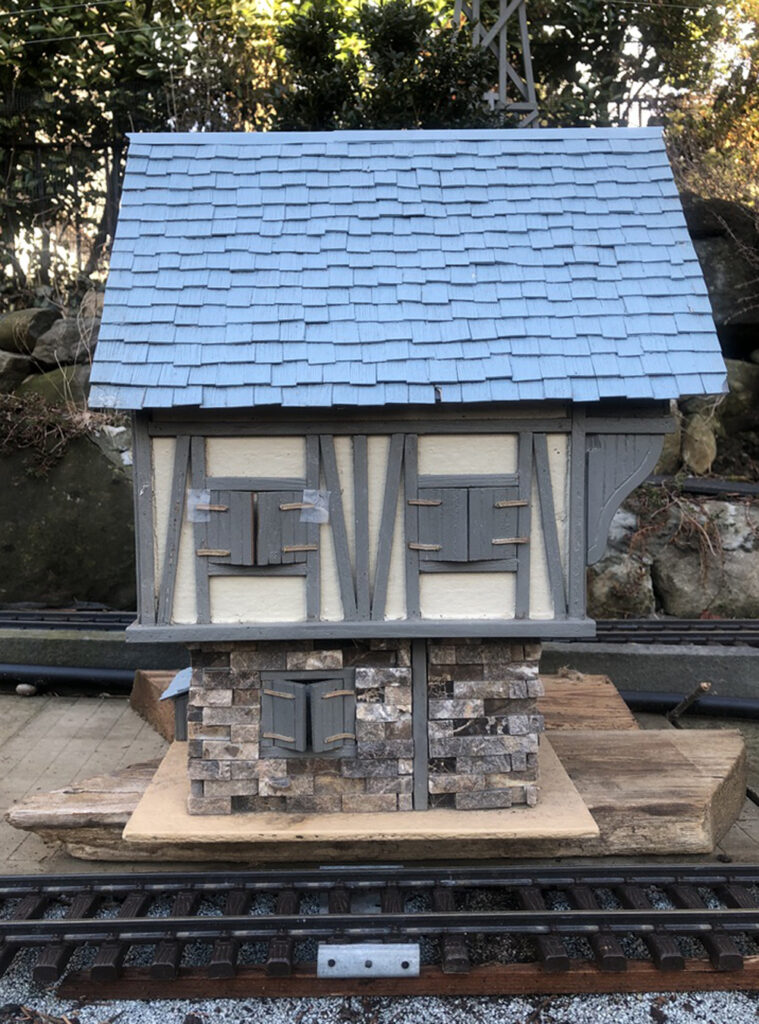
North wall – has one window on the first floor and two on the second floor
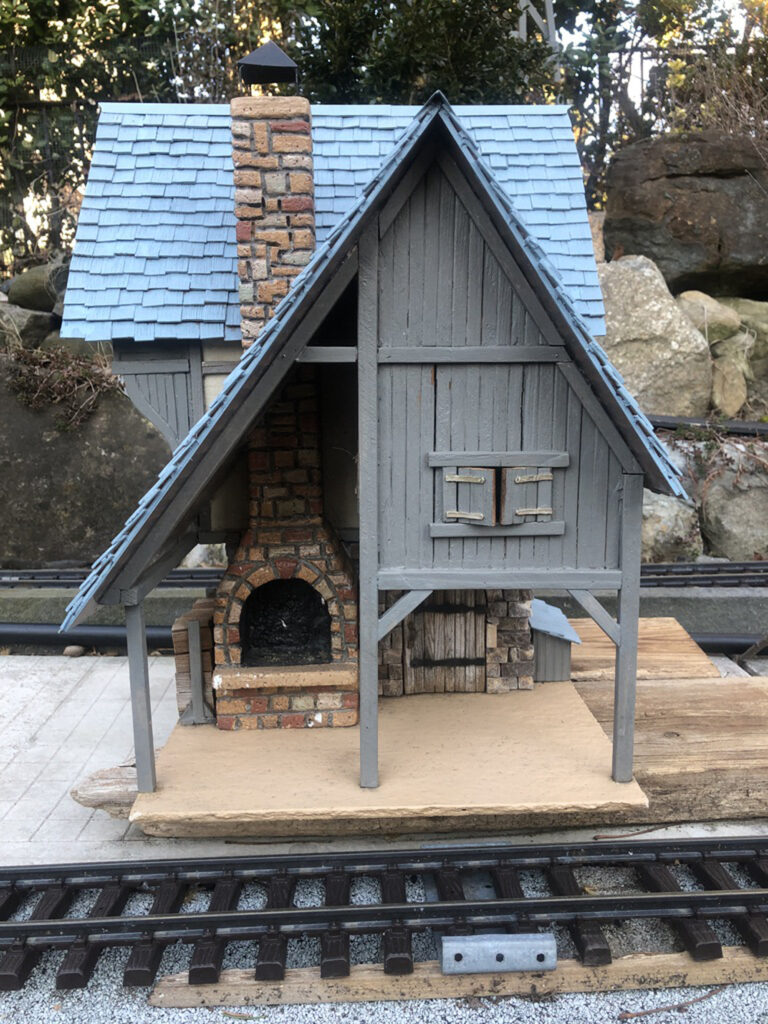
South wall – has the chimney, the door, and the second-floor wood addition
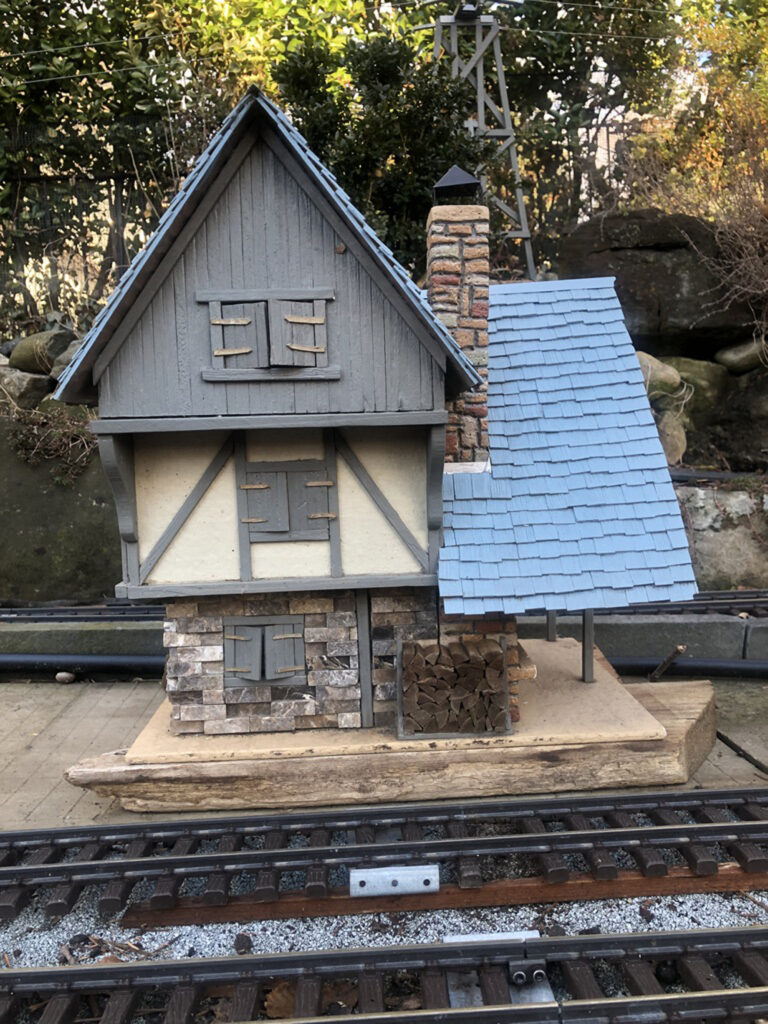
West wall – has the attic overhang supported by large brackets
Cottage dimensions
Main roof:
Run: 4¾”
Rise: 6½”
Rafters: 8”
Length at eave and ridge: 13”
Low roof:
Run: 4¾”
Rise: 6½”
West rafter 11”
East rafter 8”
Length at ridge: 8”
Length at eave: 6½”
Cottage height from base to main roof’s peak 15½”
Cottage height from base to low roof’s peak 12½”
Base (cement board):
10” (south and north sides) x 14¼” (west and east sides)
First floor walls (cement board):
All four walls 4” x 7”
Second floor walls (cement board):
Floor base 8” x 9”
East and West walls: 11½” from floor to roof’s peak
North and south walls: 5” H, from base to roof eaves
Second floor wood addition:
Floor base (cement board): 4¾” x 4¾”
South wall (cedar strips): 7½” to roof’s peak
East wall (cedar strips): 2¼”
West wall (cedar strips): 6¾”
Supporting posts and structural framing: ¼” pressure-treated strips
Attic overhang (west elevation):
Base (cement board): 7½” x 1½”
East wall (cedar strips): 6¾” x 8” to roof’s peak
North and south walls (cedar strips): 1¼” x 1¾”
Note: North and south walls are only 1” high, but because they are glued on top of the ¼” thick base, the overall height is 1¼”
Brackets (¼” thick cedar stock): 1½” x 2¾”H
East elevation attic box window (cedar and pressure treated strips):
Box: ½” x 2-5/8” W
Front wall: 2-5/8” x 4” to roof’s pitch
Roof (Plexiglas panels): 1” x 3”
Chimney/fireplace (one-piece rigid foam):
14½” overall height
3½” x 2¾” base
5” fireplace height including slopes
3¾” from floor to top of fire pit arch
2” x 2” x 9½” chimney/flue
Fire pit opening: 2 1/8” x 2 1/8”
Windows:
1/8” x ¼” cedar strips for most window trimmings (as needed)
Opening of all house windows: 1½” x 2”
Exceptions:
Opening of windows in second-floor wood addition: 1½” x 1” H
Opening of attic box window: 1¾” x 1” H
Locations for most windows are about 1½” from bottom
Locations for attic box window and second-floor wood addition are about 1¼” from bottom
Door (cedar strips):
2¼” x 3½”, with round top and dummy copper hinges
Window shutters:
1/8” x ¼” cedar strips sized to fit each window opening
Preparation
Rip all strips needed for the structure
Sand and coat strips with Pewter stain and sealer
Cut about 1,300 shingles (more than 1,200 used)
Make cardboard templates for walls, roofs, and bases (exception: I made the lower roof templates later, once the main roof plexiglass was glued to the structure)
Using templates, cut all floors, walls and bases (I used a single-edge knife)
Out of plexiglass, cut the main roof pieces, including the roof pieces for the attic box window (lower roof pieces get measured and cut after main roof is installed)
Out of ¼” cedar stock, cut and carve the two large attic brackets: 1½” x 2¾”
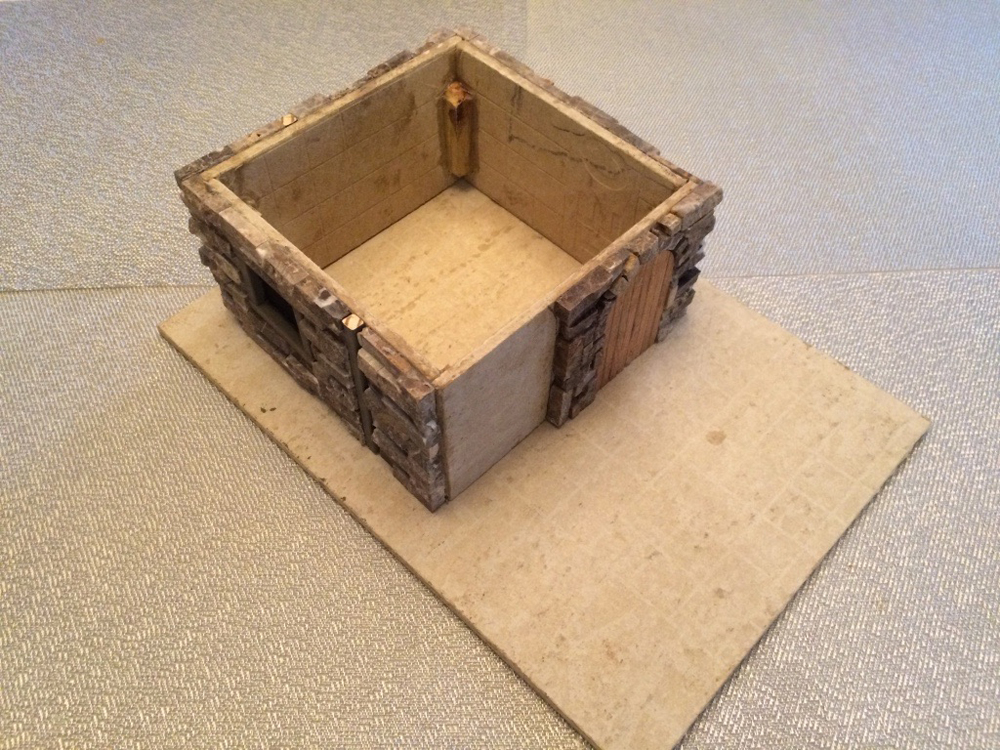
The first-floor walls are glued using silicone caulk, with reinforcements inside the corners to make sure it is square. Using caulk, apply the individual stones to the first-floor walls, taking care to fit them around the door and chimney on the south wall.
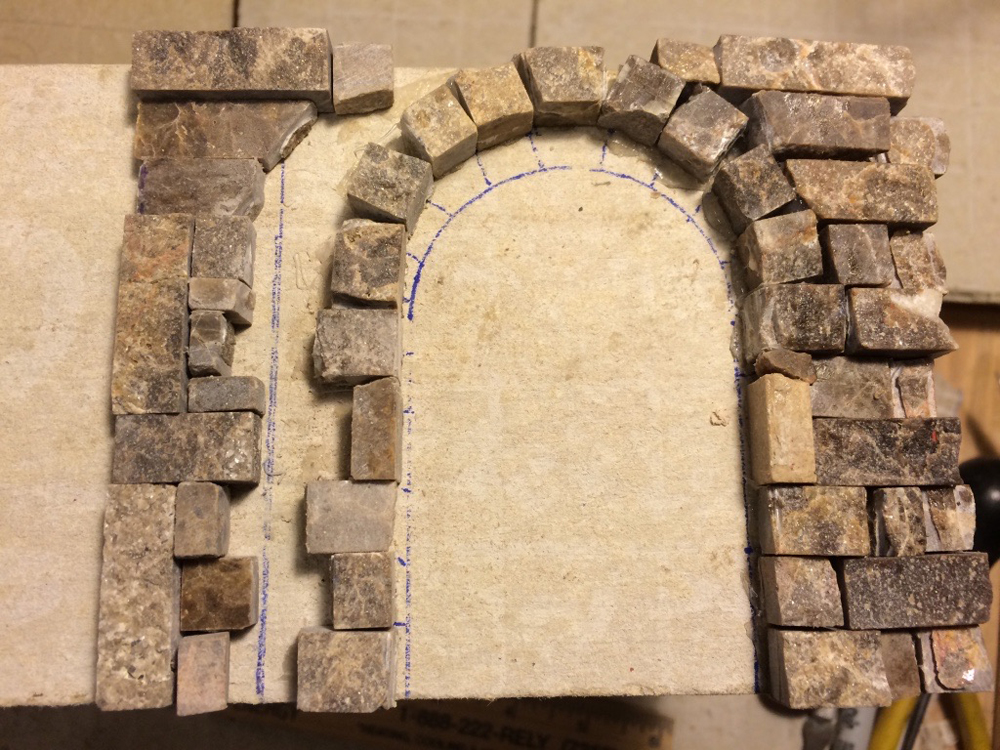
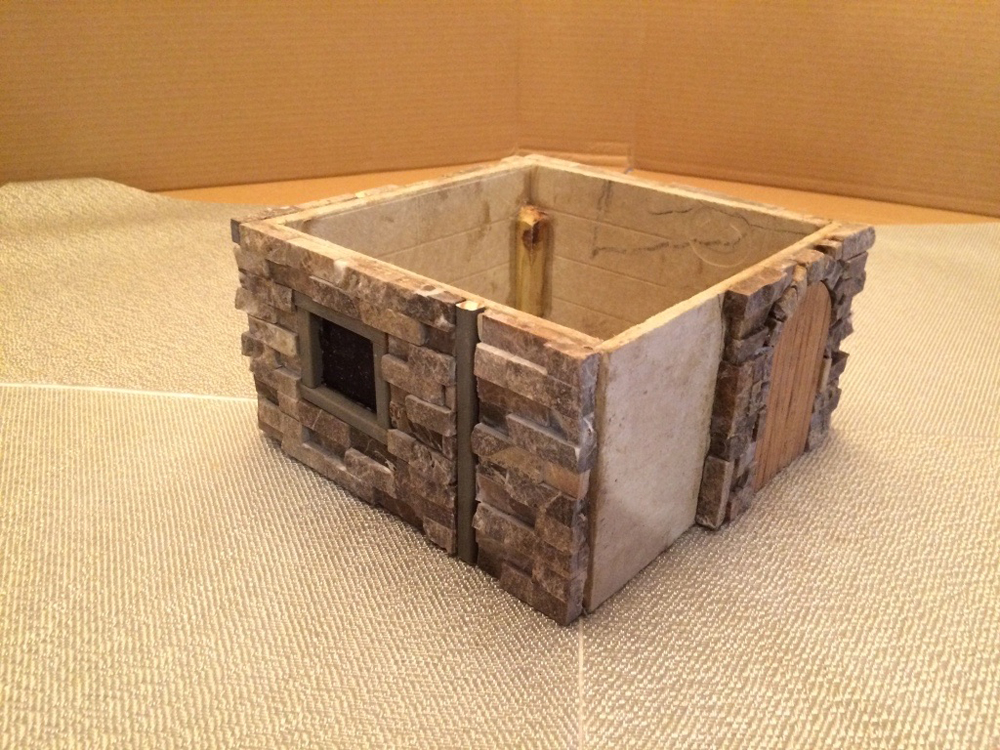
On west, north, and east walls, the cottage image shows a vertical structural beam off-center on these three walls. I couldn’t see the reason for them, but since they looked good, I included them: ¼” strips 4” high, about 2” from the right edge of each wall.
Paint house base with sand color latex paint, and when paint dries, attach floor walls with caulk.
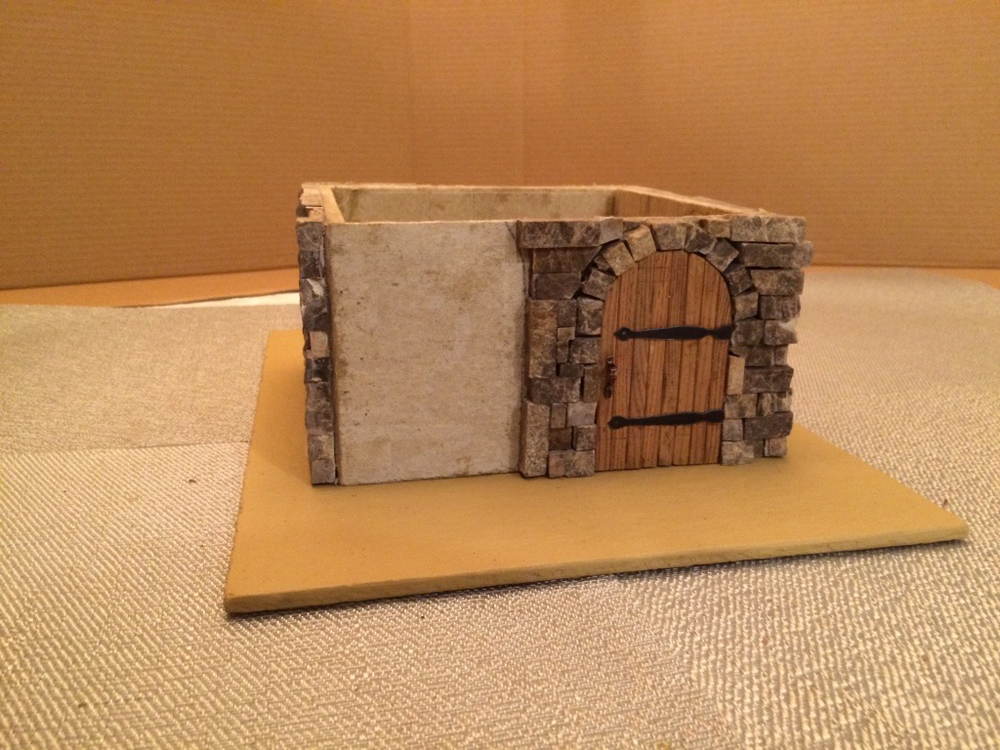
The door is made from individual wooden pieces, has two “dummy” hinges made out of sheet copper, and has two coats of clear varnish. Attach it using caulk.
Build a small cottage: Second floor (including attic)
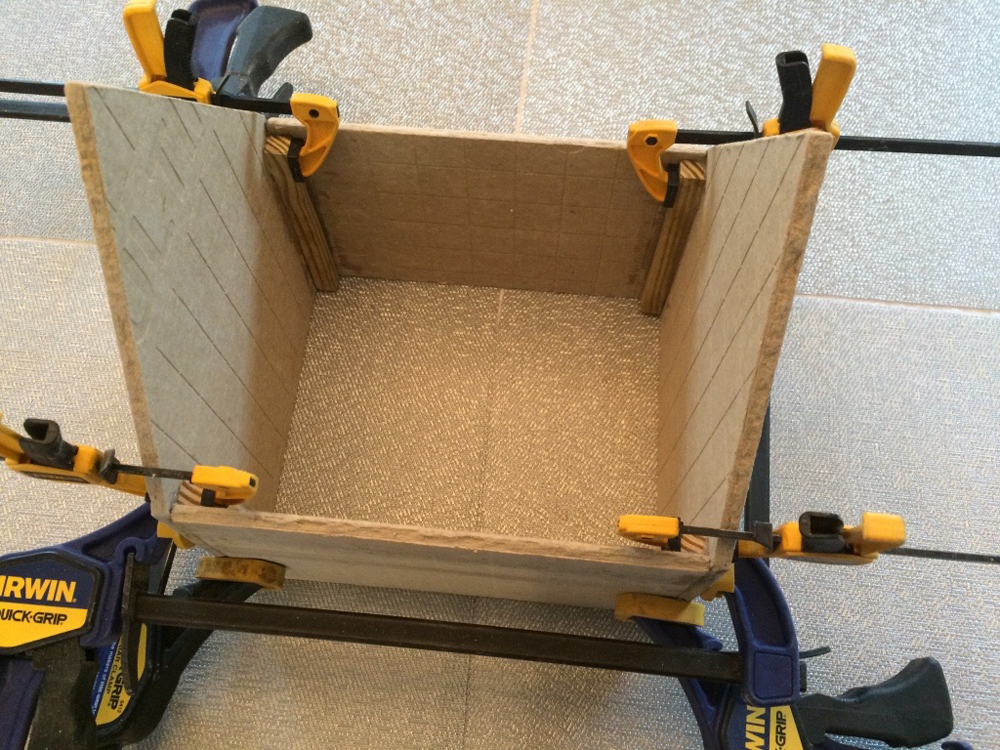
Using the same process as the first floor, assemble the four second-floor walls.
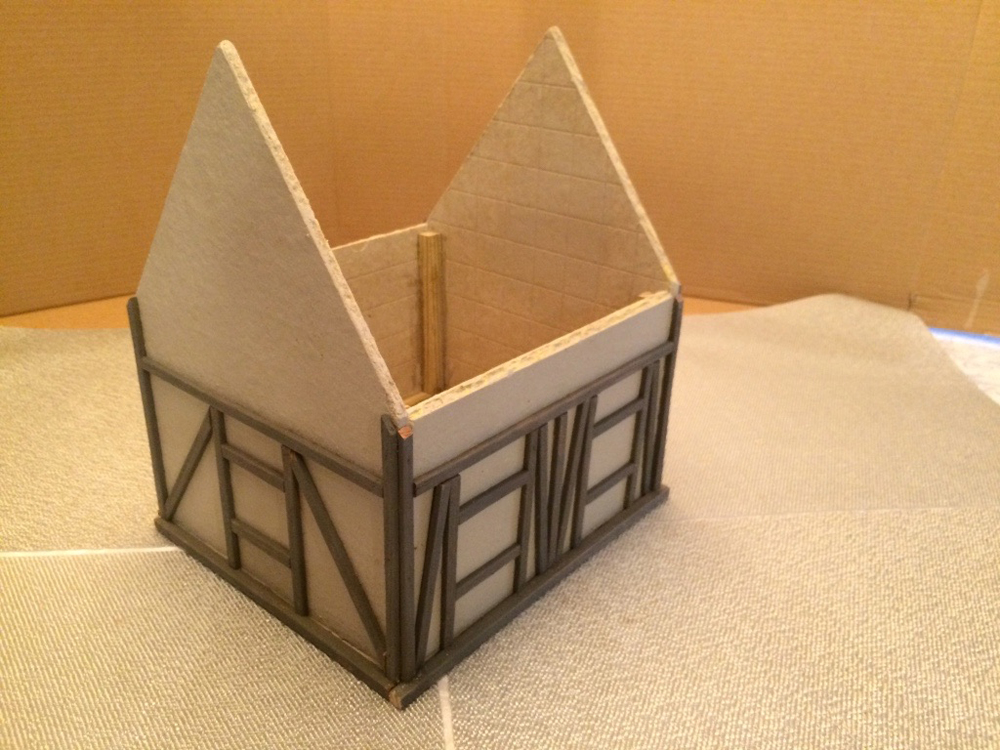
Apply half-timbers to the walls and window frames using carpenter’s wood glue.

Using caulk, attach walls to base and attach module to first floor.
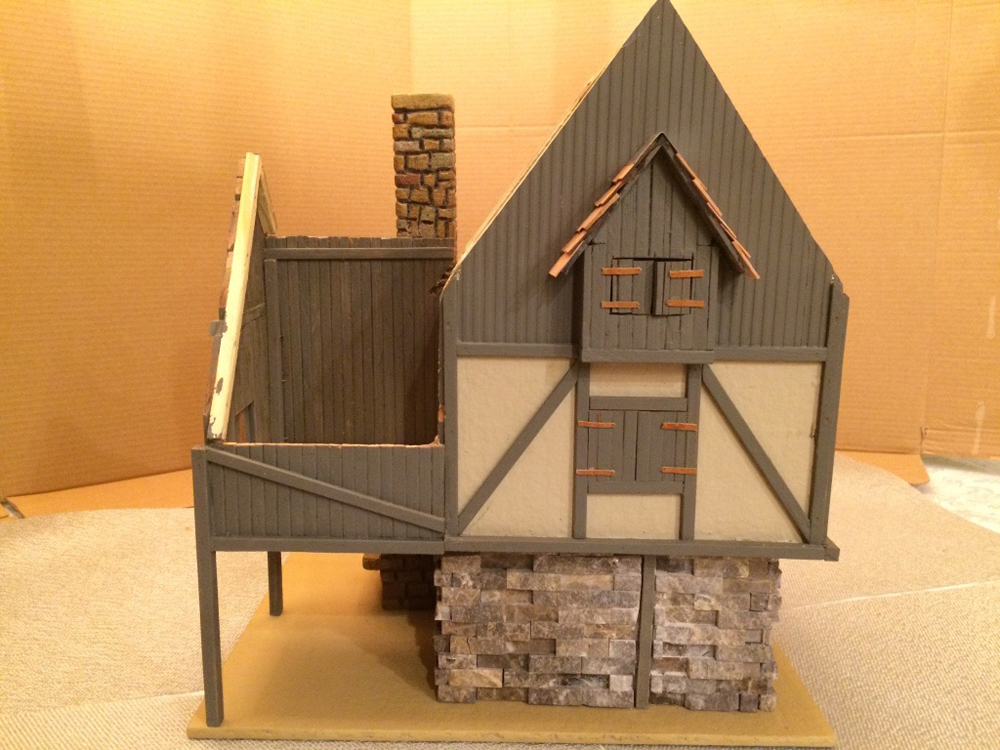
On east wall, a horizontal half-timber glued 4” above the floor visually separates the second floor and the attic. The attic portion of this wall gets covered entirely with half-timbers.
Paint the stucco walls with light yellow exterior latex house paint.

Secure with glue and pins the ¼” strips around the bottom perimeter of 2 walls (north and east). NOTE: for west wall, a 16” long piece is needed to help support the roof above the chimney/fireplace; this gets attached later when building the lower roof. Because the south wall is covered by the chimney and the second-floor wooden addition, some customization is required to apply small pieces of trimming as needed.
Build a small cottage: Attic box window
Glue 2 pieces of ¼” x 2 5/8” “beams” to build the base.
Glue and pin the base to the top horizontal half-timber of the second floor east wall.
Using cedar strips and glue, build and attach the 3 walls.
Attach the roof panels with caulk and frame the window with cedar strips and glue.
The shingles can be attached at this point, or later with the rest of the roofing.
Build a small cottage: Attic wood overhang

Using the cardboard template, glue together the cedar strips to assemble the 3 walls, N, W, and S.
Using caulk, glue the bottom of west wall to the front of the base (base hidden behind wall).
Glue bottoms of north and south walls to the top of the base (base shows).
To strengthen the east wall, and from behind, glue and pin two joists of ¼” strip behind the top edges to form an “A” frame, including a horizontal, 4½” long piece on top of the window opening (only glue).
Frame the bottom of this module by gluing and pinning ¼” strips on the south, west, and north bottom sides.
Glue and pin the two large brackets below the north and south walls and attach this module to the west cement board wall with caulk.
Glue and pin a piece of ¼” pressure-treated strip to complete the ridge support.
Glue the exterior window trimmings.
Build a small cottage: Second floor wood addition
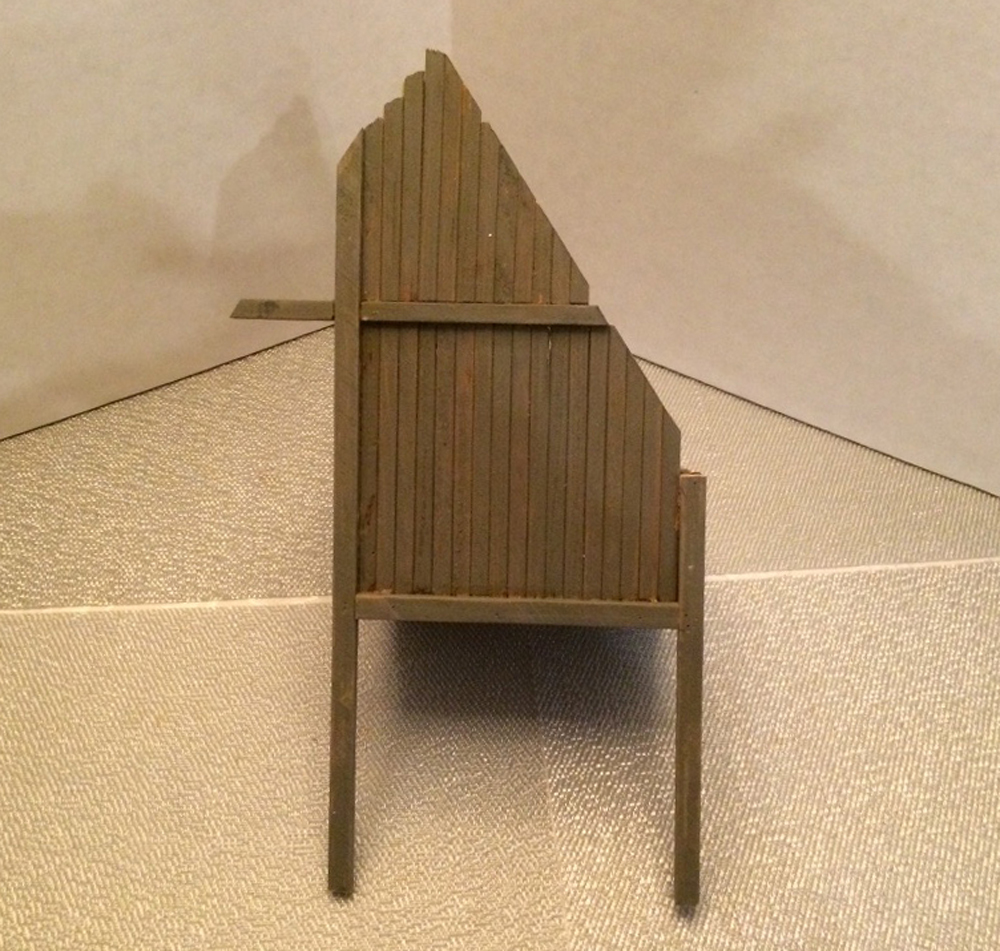
This module can be very complex to build. Please examine the pictures, which show the completed module. The instructions below can be changed to fit your own way of building. Using the cardboard template and ¼” pressure treated strips, assemble part of the “A” frame for south wall.
The vertical beam in the center of the “A” frame has a horizontal beam forming a cross, which cuts the south wall into upper and lower portions. In my case I needed 17 cedar strips for the bottom portion and 12 strips for the upper to fill the front of the “A” frame. The side walls are 5” and each use 18 cedar strips.
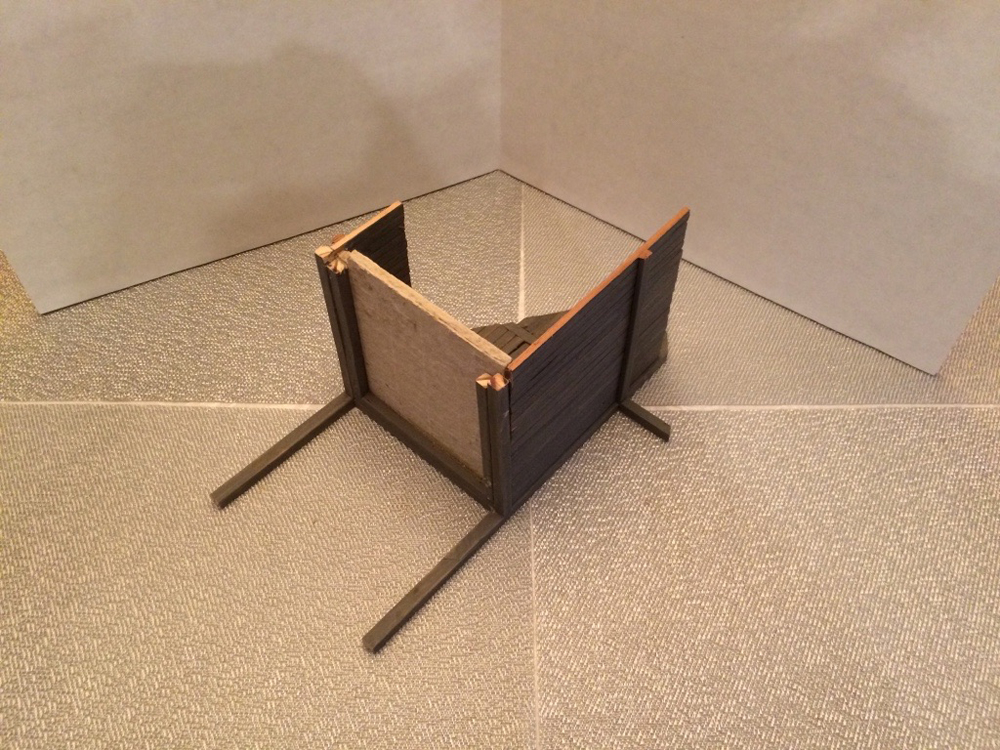
Glue the bottom of all three walls to the cement board base, glue ¼” strips to the perimeter of the floor, meshing with “A” frame, and to strengthen this module, sister another row of ¼” strips under the base.
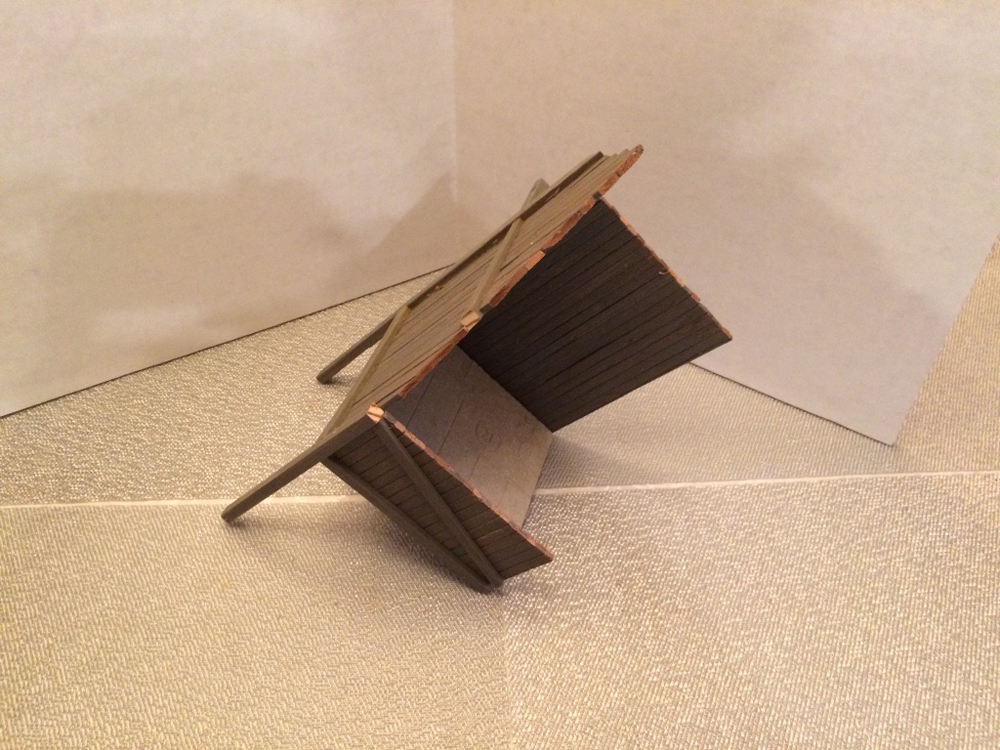
The entire exterior is coated with the Pewter stain.
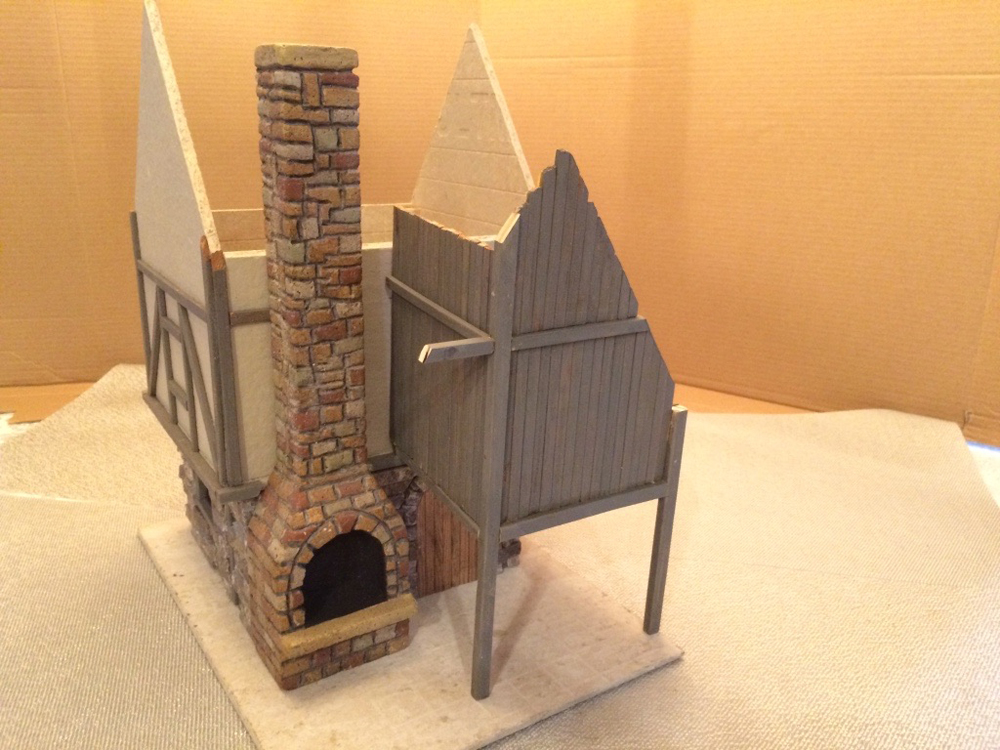
Once dry, use caulk to attach this module to the second floor’s south wall.
Glue framing to both windows. Although the window on west wall is hardly seen, it is the same size as the window on the south wall.
Build a small cottage: Chimney/fireplace
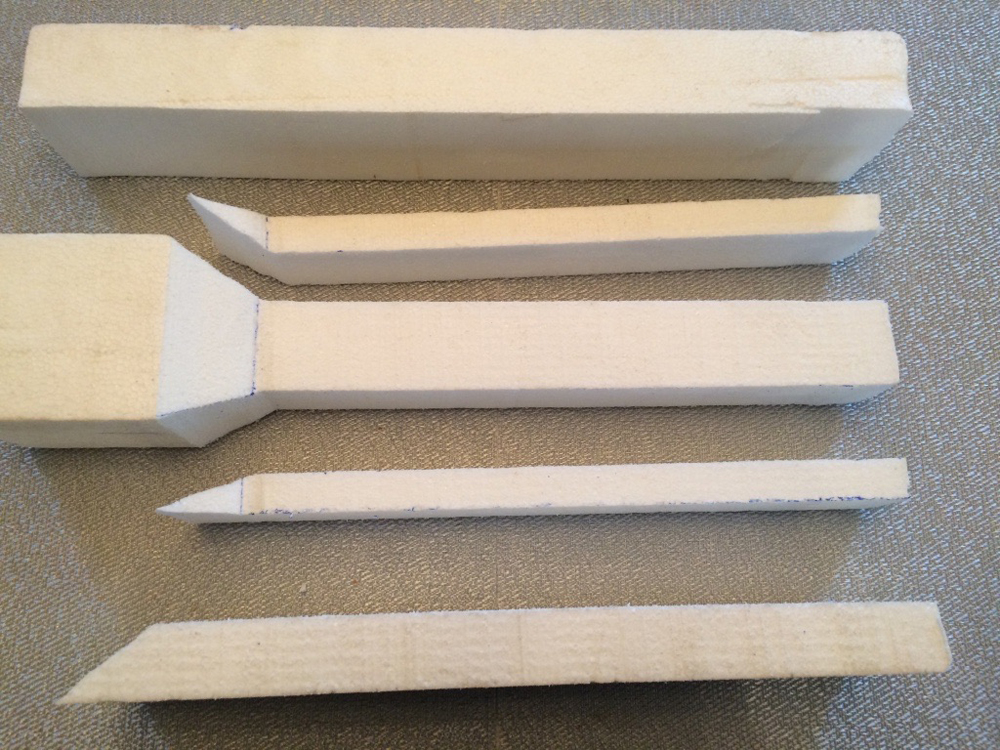
The fireplace measures 3½” x 2¾”, and it slopes on three sides as it connects to the 2” x 2” chimney portion. The portion of the fireplace is 5” tall, including the sloped portion.
To obtain the 3½” x 2¾” x 14½” piece of white foam, I needed to trim 1¾” lengthwise, with the bandsaw, from the piece I had at hand. Carve a 1¼” thick slice for the front. Carve two 5/8” thick slices from each side. Carve two ½” thick pieces to form the fire pit shelf, which is 3/8” thick. With a soldering iron, delineate the opening of the fire pit, the individual stones, and the cap stone, and with a rotary tool and modeler’s knife, carve out the cavity for the fire pit.
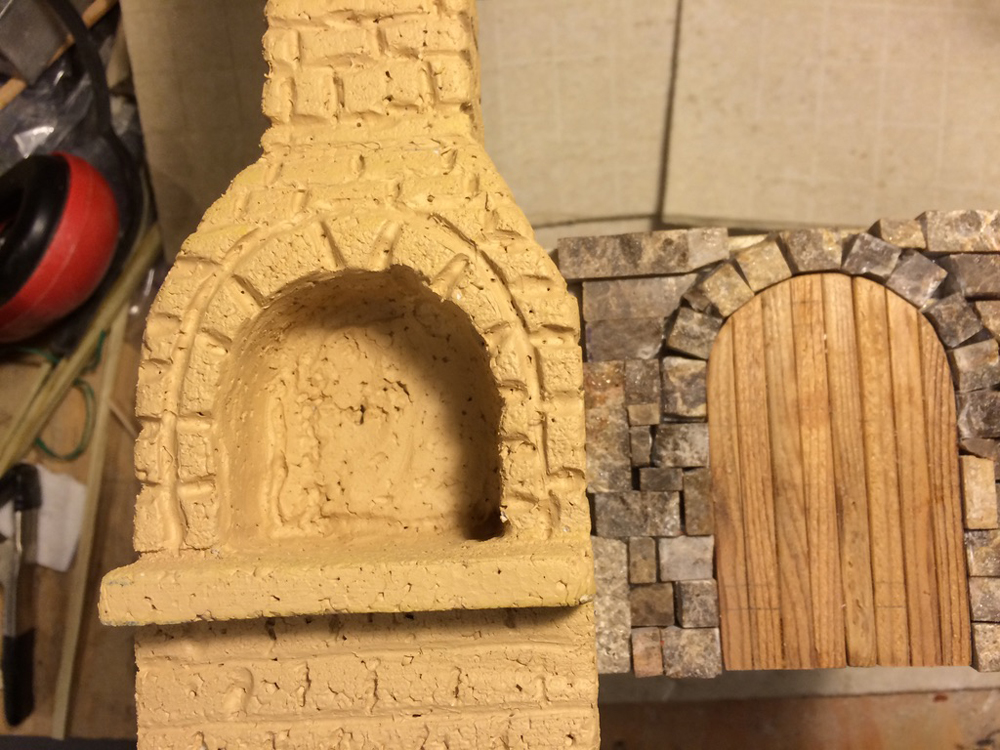
Using latex paint (to protect the foam), coat the entire unit a sand color to represent rocks or stones. Highlight each stone with different shades, then highlight the mortar lines with a black permanent marker. Finally, paint the fire pit black. The whole unit gets two coats of clear matte spray paint with UV protection.
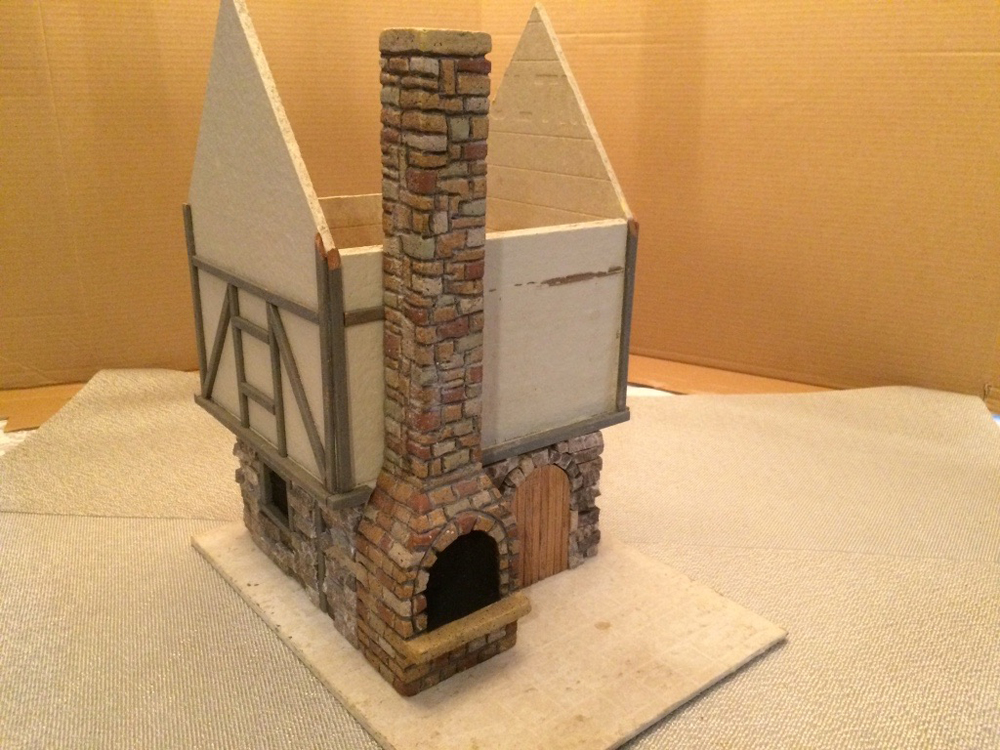
When the paint dries, use caulk to attach chimney to cottage. Optional: make an aluminum/wire chimney cap, and paint it flat black.
Build a small cottage: Roofs
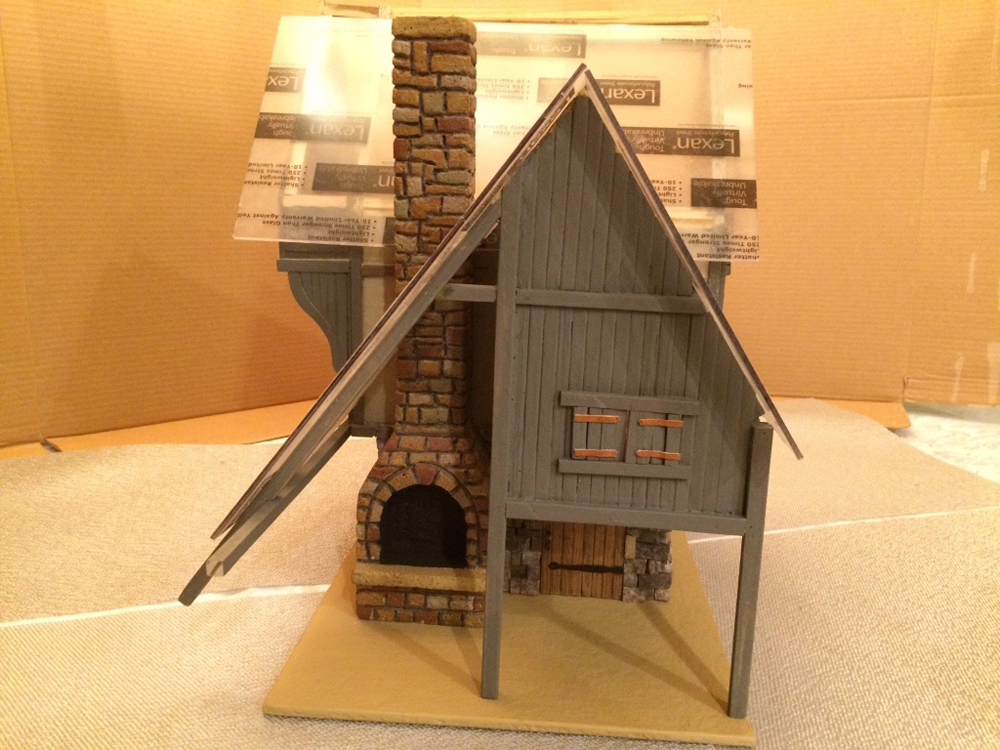
When assembling the low roof, complete the “A” framing on south wall’s second floor addition, by gluing the rest of the frame with ¼” pressure treated trimmings.

Using caulk, attach the Plexiglas pieces to form the main roof, then measure and cut cardboard templates for the low roof, in order to cut and attach the Plexiglas for the low roof.
Optional: install “cricket” where main roof meets the chimney.
Optional: Using caulk, install thin aluminum “flashing” between roof and chimney.
Apply cedar trimming where roof meets walls.
Cedar shingles and aluminum roof ridges
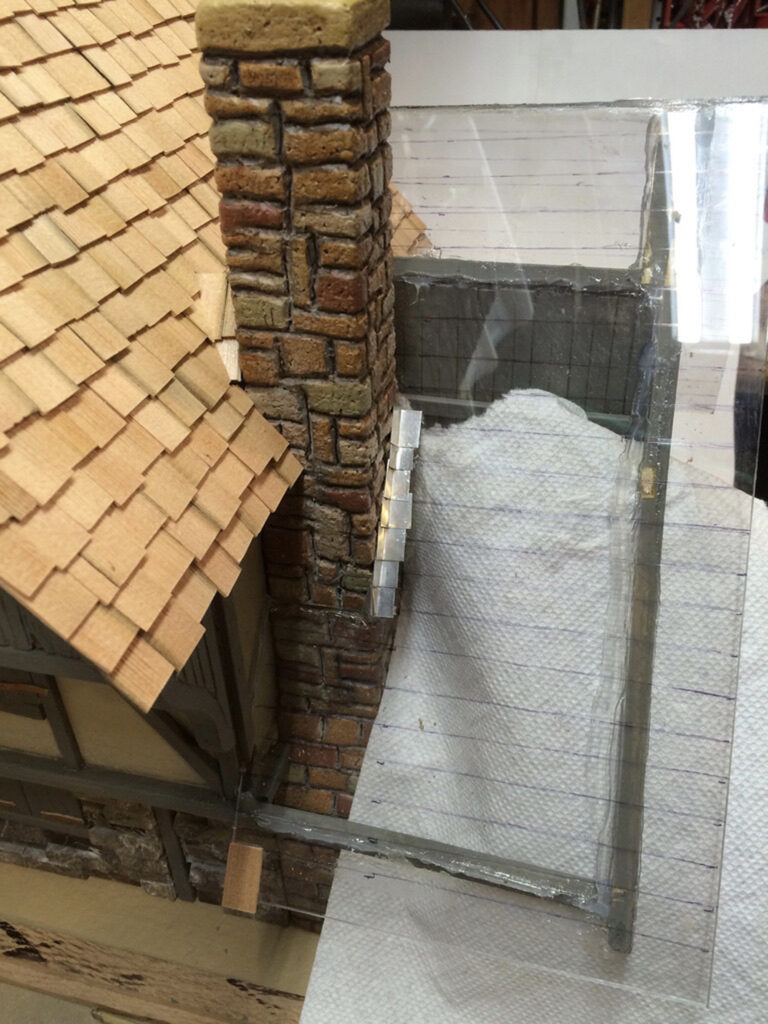
Starting at the eaves, draw horizontal lines on the Plexiglas about ½” apart. Drawing two thin beads of caulk, one at the bottom edge of the roof and the other at first line, apply shingles “unevenly” using first line as guide; leave some overhang. Repeat process on subsequent rows until entire roof is shingled.
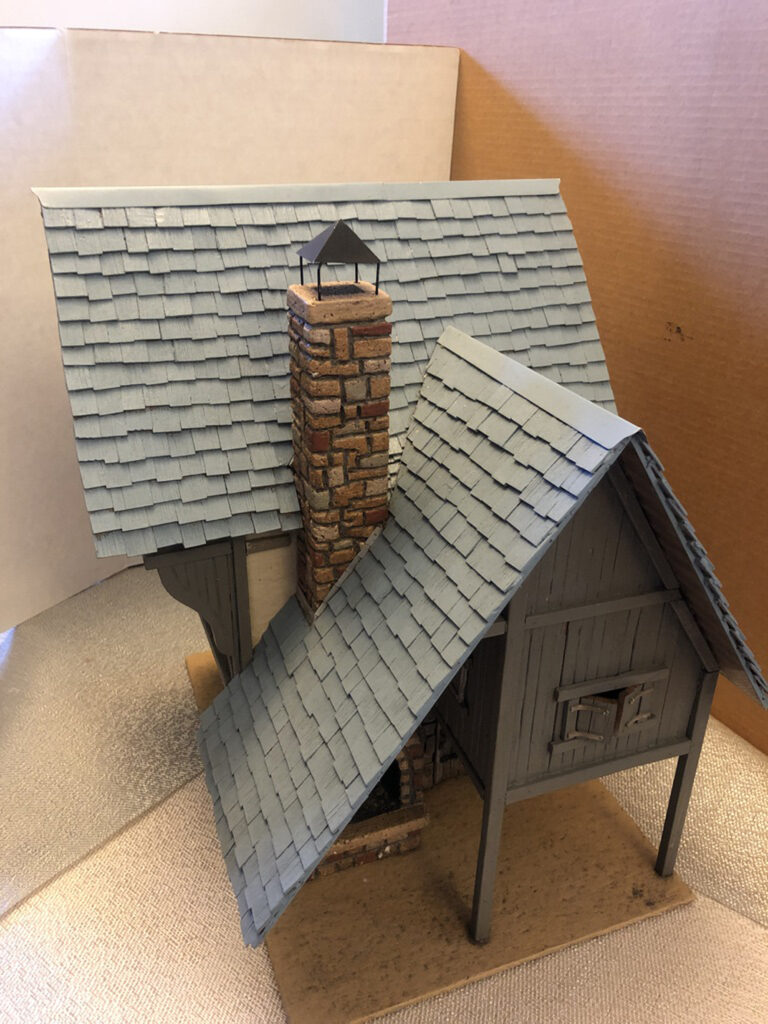
For the roof ridges, bend lengthwise at an angle a 1” x 13” sheet aluminum strip to cover entire ridge of main roof (note the “decorated” ridge ends), repeating process for low roof and (if used) cricket. Coat roofs with Gettysburg light blue exterior stain and sealer.
Build a small cottage: Window shutters
Cut and glue together cedar strips to fit each window, using thin leader strips as hinges. (I couldn’t come up with a better hinge system – planning to retrofit them with handmade copper hinges at some point.)
Build a small cottage: Extra details
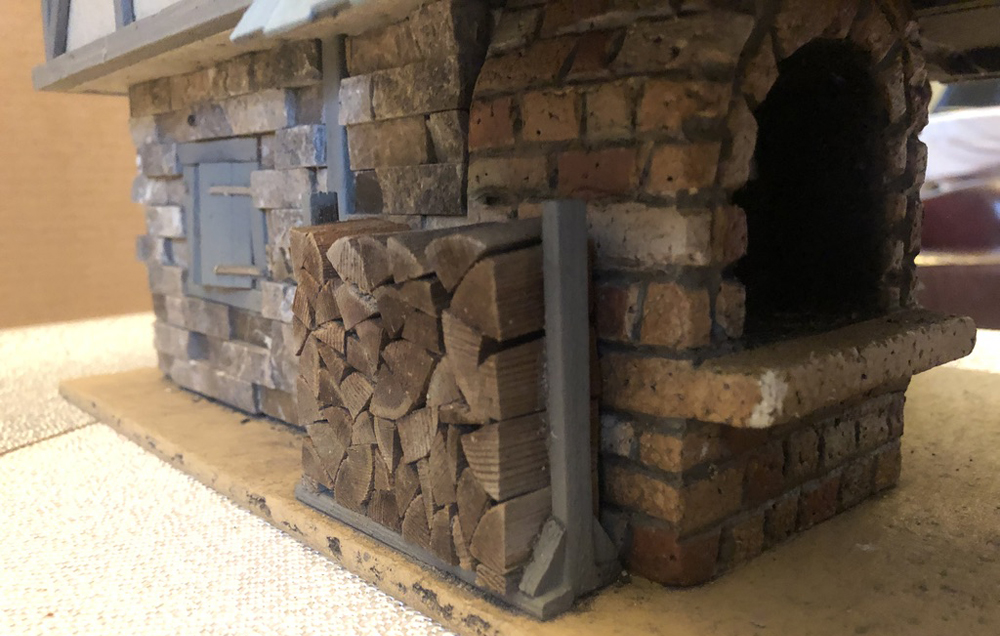
The firewood rack on the west wall, right next to the fireplace, measures 3” x 3” x 1”. I used 1/8” x ¼” cedar strips to build the frame and filled it with ½” x ¾” pieces of split G scale logs (twigs) to represent firewood.
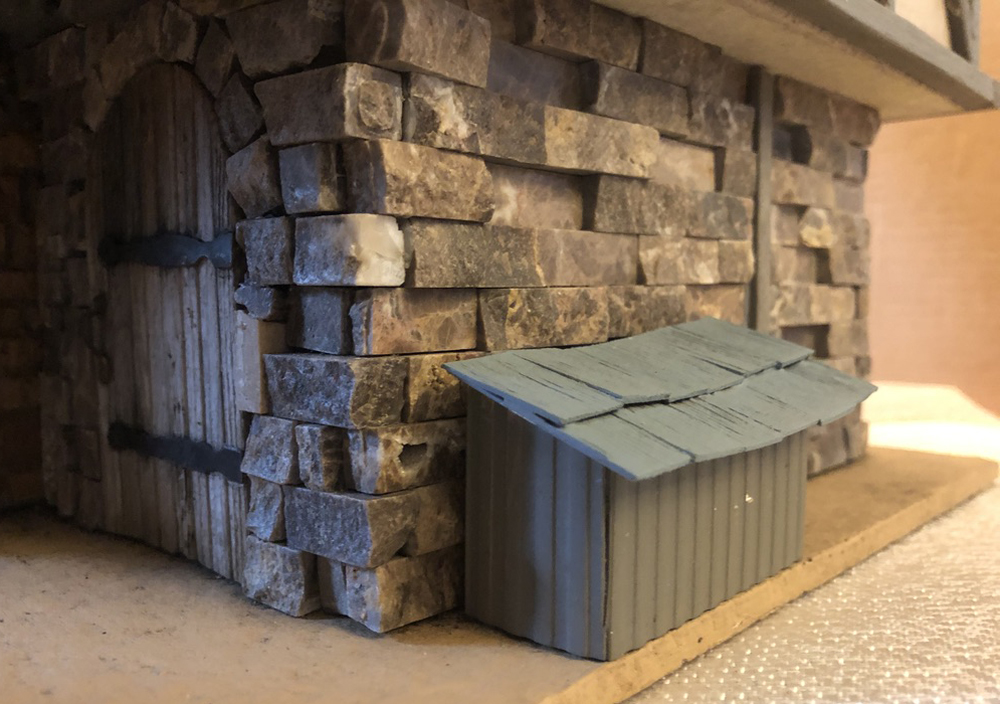
The storage box on the east wall measures 2½” x 1” x 1½” H. It is made from a solid piece of pressure treated wood, veneered with scribed styrene, painted, and roofed with shingles.
Conclusion
Looking at the finished project I can say that the cottage came out looking better than I expected. It turned out to be very sturdy and has resisted the elements very well. It blends well in the railway no matter where I place it. Except for the winters, it has been out taking all Mother Nature has thrown at it for four years and is still in pretty good shape.




Lovely! Well done!